Part-1 : Oracle XML Publisher Reports: Advanced XML publisher Coding in the Template.
Oracle XML Publishers Reports
XML Publisher provides lots of Flexibility in Oracle Reporting System. If you are not using xml publisher and you are doing your report development completely in Oracle RDF then you can design maximum 1 layout with 1 RDF report but if your business requirement to use different layout for different BU’s then you cannot stick to Oracle RDF layouts because you must develop different RDF for each BU’s but if you will use XML Publisher for Layout designing then you don’t need to develop different RDF for each BU’s. You can use one RDF but develop different layouts in XML publisher for each BU’s so you can think that how much it gives Flexibility.
Even XML report supports multi languages that is also an important feature of XML reports beside this we all know that XML reports are very impressive and their Layout qualities are too too good as compared to RDF paper layouts.
We all know that, how to build an basic xml reports but in this post I will share some advanced XML publisher techniques which can help you to take care some complex scenario in XML reports designing.
How to use If statement in XML reports.
Some time we have requirement in Layouts that, we want to display some xml tags or values based on some report column values or some other xml tag value. So we can use if command in xml RTF layouts to display data based on conditions like below.
<?if:XML_TAG_NAME =’COMPARISON VALUE’?> <?end if?>
As an example, I want to his or her name based on gender value of xml tag then I will use if statement as below.
<?if:GENEDER_TAG =’MALE’?> His<?end if?> <?if:GENEDER_TAG =’FEMALE’?> Her<?end if?>
This is how we can use if statement.
How to Create Group as below
<?for-each:G_VENDOR_NAME?> <?end for-each?>
How to Show Multiple or Complex Headers and Footers :-
If your template requires multiple headers and footers, create them by using XML Publisher tags to define the body area of your report. You may also want to use this method if your header and footer contain complex objects that you wish to place inform fields. When you define the body area, the elements occurring before the beginning of the body area will compose the header. The elements occurring after the body area will compose the footer. Use the following tags to enclose the body area of your report:
<?start:body?> <?end body?>
Use the tags either directly in the template, or inform fields.
Insert <?start:body?> before the Suppliers group tag: <?for-each:G_VENDOR_ NAME?>
2. Insert <?end body?> after the Suppliers group closing tag: <?end for-each?>
The following figure shows the Payables Invoice Register with the start body/end body tags inserted:

How to insert chat or create chat based on your report output in xml publisher rtf output.
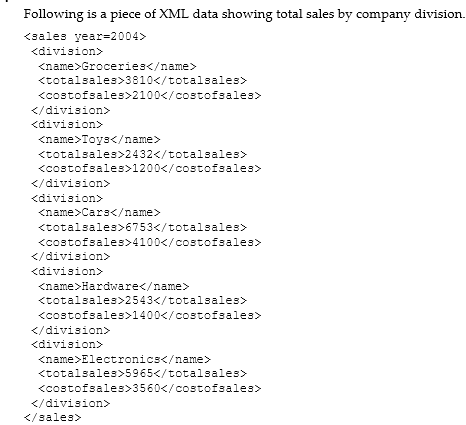
This example will show how to insert a chart into your template to display it as a vertical bar chart as shown in the following figure:

To Display chart in your report output , you have to follow below steps.
Inserting the Dummy Image
The first step is to add a dummy image to the template in the position you want the chart to appear. The image size will define how big the chart image will be in the final document. Important: You must insert the dummy image as a "Picture" and not any other kind of object.
The following figure shows an example of a dummy image:

Right-click the image to open the Format Picture palette and select the Web tab. Use the Alternative text entry box to enter the code to define the chart characteristics and data definition for the chart.
The following graphic shows an example of the XML Publisher code in the Format Picture Alternative text box:

chart:
<Graph graphType = "BAR_VERT_CLUST">
<Title text="Company Sales 2004" visible="true" horizontalAlignme nt="CENTER"/>
<Y1Title text="Sales in Thousands" visible="true"/> <O1Title text="Division" visible="true"/>
<LocalGridData colCount="{count(//division)}" rowCount="1">
<RowLabels>
<Label>Total Sales $1000s</Label>
</RowLabels>
<ColLabels>
<xsl:for-each select="//division">
<Label>
<xsl:value-of select="name"/>
</Label>
</xsl:for-each>
</ColLabels>
<DataValues>
<RowData>
<xsl:for-each select="//division">
<Cell>
<xsl:value-of select="totalsales"/>
</Cell>
</xsl:for-each>
</RowData>
</DataValues>
</LocalGridData>
</Graph>
How to Display Pie chart in XML Publisher Reports. :-

Put the Below code in the Web tab of the Sample picture in Format Options.
chart:
<Graph graphType="PIE">
<Title text="Company Sales 2004" visible="true" horizontalAlignment="CENTER"/>
<LocalGridData rowCount="{count(//division)}" colCount="1">
<RowLabels>
<xsl:for-each select="//division">
<Label>
<xsl:value-of select="name"/>
</Label>
</xsl:for-each>
</RowLabels>
<DataValues>
<xsl:for-each select="//division">
<RowData>
<Cell>
<xsl:value-of select="totalsales"/>
</Cell>
</RowData>
</xsl:for-each>
</DataValues>
</LocalGridData>
</Graph>


5 comments:
Thanks For providng this blog, i learn About Procurement In Your Blog.
Oracle Fusion SCM Online Training
Oracle Fusion Financials Online Training
Good Blog , Thanks for sharing this informative article.
Oracle Fusion HCM Online Training
Oracle Fusion SCM Online Training
Oracle Fusion Financials Online Training
Big Data and Hadoop Training In Hyderabad
Excellent blog I visit this blog it's really awesome. The important thing is that in this blog content written clearly and understandable. The content of information is very informative.
¬Oracle Fusion HCM Online Training
Good blog,Very useful article,Thanks for sharing this information.
Oracle Fusion HCM Online Training | Oracle HCM Cloud Training Online
good information thank you
Oracle Fusion HCM Online Training
Post a Comment