How to Set PO Time Out Functionality in Oracle Apps Workflow
Hi Friends in this Post , i will show you how we can set PO time out or change PO Time out settings in Standard Purchase Order Workflow.
Step 1: You should have Workflow Builder standard Software in your system.
Step2:- Launch the Oracle Workflow Builder tool. Once opened, the user should connect to a database (a test database is preferred for the first attempt at implementing these steps) and open the PO Approval workflow.)
Step3:- Once Open the Workflow file it will show in your Tool as below.

Step 4- Go to PO Approval and then click on + icon and go to Processes and Select Notify approver as below.
Double Click on Notify approver process.

Step 5:- there is a process called 'Notify Approver'. Double-click on 'Notify Approver' so that the workflow diagram can be seen. With the diagram window fully expanded and, provided that the diagram has not been customized, you should see processes Approve PO Notification, PO Approval Reminder 1 and PO Approval Reminder 2.

Step 6:- Now Double Click on the First Process Notify Approver.

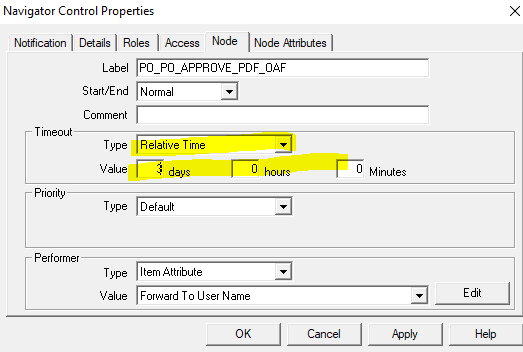
Step 7:- Double Click on the Notification Function "Approve PO Notification with PDF OAF" as below.

Step 8:- Go to Node Tab as below and Then in Timeout Block Set Type= Relative Time and Put the Value in Days (You can put any days based on you business requirement from how many days you want to timeout the Standard PO approval notification and want to Sent Frist Reminder).I have put 3 as an Example and then apply.
Step 9:- Now Again back to Notify Approver Process and Double Click on PO approval Reminder1.

Step 10:- Set the Time out Value and Apply it.

Step 11:- Now Again back to Notify Approver Process and Double Click on PO approval Reminder2.

Step 12.
Save the Updated wft file in your test Database and do the testing.

If you are getting any issue during save then dont save this file in your DB.


3 comments:
nice one
Good blog, Thanks for sharing this informative article. It would be helpful to all if you write a full article.
Oracle Fusion HCM Online Training"
Good Article, Alots of information provided, Thanks for sharing this information.
Oracle Fusion HCM Online Training
Post a Comment