How to use advanced table in oaf
In this post , We will be discuss about advanced table in the oaf. Advanced table is the region style available in the OA framework. We use Advanced Table , when we want to represent the data in the OAF page in more presentable form and allow users to do multiple operations with this set of data in the OAF page.
1.In advanced table , we can create the Sortable header for each columns of the table. It means we can sort the data of the Table through its Table Column in the OAF Page.
2.In Advanced Table , we can create the Summary total in the footer of the Advanced Table. This is the Add on to create the Total in the footer of the Advanced Table.
3.In Advanced Table , We can create the Button to insert new row in the Table to insert data by the user in the OAF Page.
4.Advanced Table provides Multi Select and Single Select options by which if we can control the data selection in the Advanced table region .
Here below I have create the workspace 'XXAdvancedTable' under this workspace we have created the Project 'XXAdvancedTable' . Under this project , we have created the Page 'XXAdvancedTablePG'.
Step1:- We have create the 'XXAdvancedTablePG' as below , under this page region We have created the new region with style 'AdvancedTable'.
Right Click on the Page region and click on the region as below. This will create the new region as below.
Step2:- Change the Region style 'advancedTable' in the property inspector.
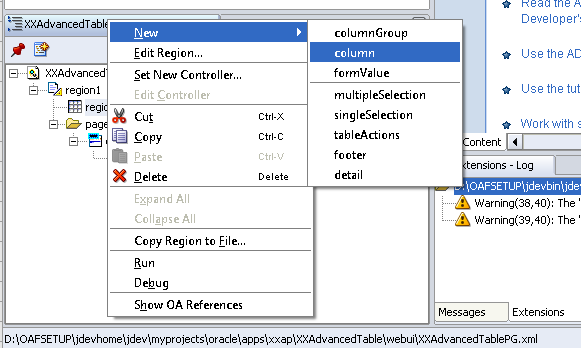
Step3:- Now Right Click on the Region2(AdvancedTable) and click on the column.
Step4:-This new column1 has been created as below , under region2(advanced table).
When we created column under advanced table then automatically Column Header creates for each column of the Advanced table.
Step5:-Now again right Click on the Column1 and then Click New and Then Click Item.
This will create the Column of the First column. In this Column , we map the VO attribute which shows the data from the View Object in the advanced table of the OAF Page,
Step6:- With the same steps we will create the Column2 as below.
In the Column Header , we can allow the sortable feature to the columns of the Advanced Table by which user can sort the data of the Advanced Table in the OAF Page.
Right Click on the Column Header and select the sortableHeader to enable the sortable feature of Advanced Table Column.
Here below We have Create the Supplier Name headers as below.
Steps to create advanced table in oaf


1 comments:
Splendid blog I visit this blog it's unimaginably great. Inquisitively, in this blog substance shaped without a doubt and reasonable. The substance of data is useful.
Oracle Fusion HCM Online Training
Oracle Fusion Financials Online Training
Post a Comment