Steps to create advanced table in oaf
In this post , I am sharing the steps to create advanced table in oaf page. Here below I have create the workspace 'XXAdvancedTable' under this workspace we have created the Project 'XXAdvancedTable' . Under this project , we have created the Page 'XXAdvancedTablePG'.
Step1:- We have create the 'XXAdvancedTablePG' as below , under this page region We have created the new region with style 'AdvancedTable'.
Right Click on the Page region and click on the region as below. This will create the new region as below.
Step2:- Change the Region style 'advancedTable' in the property inspector.
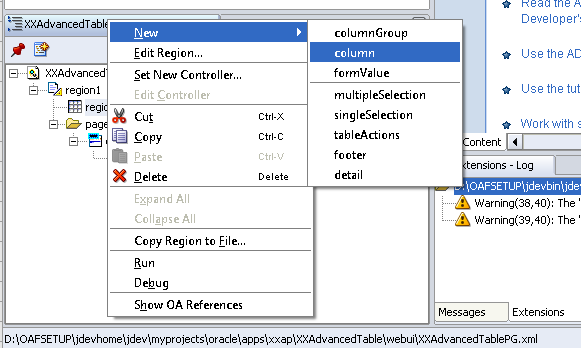
Step3:- Now Right Click on the Region2(AdvancedTable) and click on the column.
Step4:-This new column1 has been created as below , under region2(advanced table).
When we created column under advanced table then automatically Column Header creates for each column of the Advanced table.
Step5:-Now again right Click on the Column1 and then Click New and Then Click Item.
This will create the Column of the First column. In this Column , we map the VO attribute which shows the data from the View Object in the advanced table of the OAF Page,
Step6:- With the same steps we will create the Column2 as below.
In the Column Header , we can allow the sortable feature to the columns of the Advanced Table by which user can sort the data of the Advanced Table in the OAF Page.
Right Click on the Column Header and select the sortableHeader to enable the sortable feature of Advanced Table Column.
Here below We have Create the Supplier Name headers as below.
Steps to create advanced table in oaf


2 comments:
Very nice article
Oracle SOA Online Course Bangalore
Splendid blog I visit this blog it's unimaginably great. Inquisitively, in this blog substance shaped without a doubt and reasonable. The substance of data is useful.
Oracle Fusion HCM Online Training
Oracle Fusion Financials Online Training
Post a Comment