Part1 How to integrate OAF Notifications in Oracle Workflow Builder.
In this post , we will discuss how we can use the OAF Notifications in the Oracle Workflow Builder. We often see the OAF Pages uses In the Purchase Order and Expense reports approval Notifications. The good part to use the OAF notifications in the Workflow Builder to send Approval Notifications is that , We can do Personalizations of these OAF notifications to meet the Business requirements. Second good part to use the OAF Notifications in Oracle Workflow builder is that , in future we need to change the layout of the Notifications , then we can integrate oaf region in oracle workflow notifications also.
I will show you the Step by Step for how we can create OAF notifications and then Integrate this Notifications in the Workflow builder Message or in the Workflow Builder Notifications.
How to integrate oaf region in oracle workflow notifications
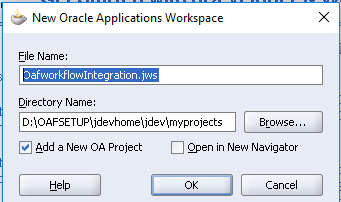
Step1:- Create a Workspace as below in the JDeveloper.
Step2:- Creating Project in JDeveloper as below
Project Name: OafWorkflowIntegration
Default Package: oracle.apps.xxap.OafWorkflowIntegration

Step3:- As below , 'OafWorkflowIntegration' Workspace and the Project has been created.

Step4:- Our Workspace and Project has been created but now we will create Region under the Project.

Step5:- As below we are creating OAF Region
Name :OafWorkflowIntegration
Package: oracle.apps.xxap.OafWorkflowIntegration
Style: StackLayout

Step6:- As below , Region has been created

Step7:- Now Again , Right click on the OafworkflowIntegration ==> Click New ==> click Region Option As below , to create the new region under the OafworkflowIntegration Region.

Step8:- New Region1 has been created as below under the OafWorkflowIntegration region.

Step9:-Change the Region Style of this Region1 as a Header as below.

Step10:-Now Again Right Click on the Region1 and Create the New Region as below.

Step11:- Region 2 has been created as Below.

Step12:- Region2 Region Style will be ' messageComponentLayout'.

Step13:-Now Right click on the Region2 and Create Item as messageTextInput as below.

Step14:-New item1 has been created as below.

Step15:-


Step16:- Now we will create the Application Module Which will be attached to this OafWorkflowIntegration region.

Creating application Module

Step17:- Application Module has been created as Below.

Step18:- Now we are assigning the Application Module 'OafWorkflowIntegrationAM' to the region.
Application Module: oracle.apps.xxap.OafWorkflowIntegration.Server.OafWorkflowIntegrationAM

This Topic is quite Long so I will be post rest of the steps related to this post in the Next Post. Please click on the Below Url for the Second Post.


0 comments:
Post a Comment